Imagine this: your dryer takes forever to finish a load, your energy bill keeps climbing, and you have no idea that hidden lint buildup could spark a house fire. Thousands of families face this reality every year. Regular dryer vent cleaning solves these problems. It boosts efficiency, cuts costs, and protects your home.
Cleaning your dryer vent once or twice a year removes flammable lint that restricts airflow and forces your appliance to overwork. Homeowners can tackle this task themselves with basic tools. This comprehensive guide walks you through everything. You will learn why it matters, how to do it safely, when to call pros, and smart maintenance tips. Follow these steps to keep your dryer running smoothly and your family safe.
Why Dryer Vent Cleaning Matters More Than You Think
Dryer vent cleaning prevents disasters and improves daily life. Lint, a mix of fabric fibers, collects in the exhaust duct over time. This buildup blocks airflow, making the dryer run hotter and longer. Your clothes take extra cycles to dry, and your utility bills rise.
The fire risk stands out as the biggest concern. According to the National Fire Protection Association (NFPA), U.S. fire departments respond to thousands of dryer-related fires annually. Failure to clean the dryer (34%) and venting system (28%) rank as leading causes. These incidents cause deaths, injuries, and millions in property damage each year.
Beyond safety, clean vents extend your dryer’s lifespan. Restricted airflow stresses the heating element and motor. Proper maintenance also improves indoor air quality by preventing lint particles and potential carbon monoxide backup from re-entering your home.
Many homeowners overlook this because the vent hides behind the dryer. Yet a simple annual cleaning delivers big returns in safety, efficiency, and peace of mind.
Signs Your Dryer Vent Needs Immediate Attention
Watch for these common red flags that signal it’s time for dryer vent cleaning:
- Clothes take longer than usual to dry, even on high heat settings.
- The dryer feels unusually hot to the touch or shuts off mid-cycle.
- You notice a burning smell or see lint around the dryer base.
- The exterior vent flap does not open fully when the dryer runs.
- Higher than normal energy bills without increased usage.
If you spot any of these, act quickly. Ignoring them turns a minor chore into an expensive or dangerous problem.
Tools and Supplies for Effective Dryer Vent Cleaning
Gather these items before you start. Having everything ready makes the job faster and cleaner.
- Dryer Vent Cleaning Kit: Flexible fiberglass rods with a round brush head. Top options include the Holikme 30 Feet Dryer Vent Cleaner Kit or Gardus LintEater system. These kits connect to a drill for powered cleaning.
- Vacuum Cleaner: A shop-vac works best, but any vacuum with a hose attachment suffices.
- Power Drill (optional but recommended): Spins the brush to break up stubborn lint.
- UL-Approved Foil Tape: Seals connections properly. Never use fabric duct tape, which fails under heat.
- Screwdriver or Nut Driver: Loosens clamps.
- Flashlight and Gloves: For better visibility and protection.
- Drop Cloth or Old Towels: Catch falling debris.
These affordable tools pay for themselves after one or two uses compared to professional service calls.
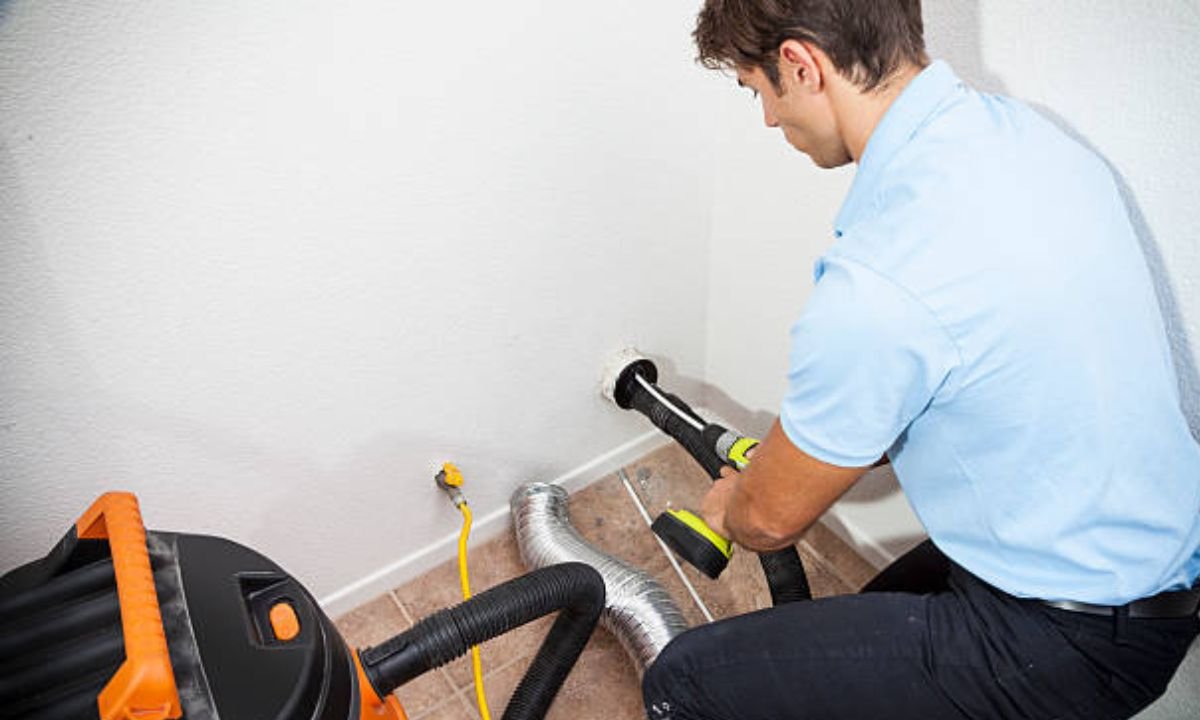
Step-by-Step DIY Dryer Vent Cleaning Guide
Follow this process for a thorough clean. Most homeowners finish in under an hour.
1. Prepare for Safety First
Unplug your electric dryer or shut off the breaker. For gas models, turn the gas valve off completely. Move the dryer away from the wall carefully to avoid damaging floors or connections.
2. Disconnect and Clean the Transition Hose
Loosen clamps and detach the flexible hose from the dryer and wall duct. Vacuum inside the dryer’s exhaust port and lint trap area. Take the hose outside, shake it out, and vacuum thoroughly. Replace it if you see tears, kinks, or brittleness. Crushed hoses restrict airflow severely.
3. Clean the Main Wall Duct
Assemble your cleaning kit rods. Attach the brush and connect to the drill (if using). Insert into the wall opening. Always spin clockwise to prevent unscrewing segments. Push and pull the spinning brush through the full length while vacuuming at the opening to catch debris.
Work slowly and repeat passes until resistance decreases.
4. Clear the Exterior Vent
Go outside and remove the vent cover. Clear all lint from the opening and check that the flap moves freely. Clean the screen if present. This step ensures proper exhaust.
5. Reassemble and Test
Reconnect the hose using new foil tape and secure clamps. Slide the dryer back without pinching the hose. Restore power or gas. Run an empty fluff cycle for 10-15 minutes to clear remaining particles. Check that hot air flows strongly outside.
Safety Tips and Common Mistakes to Avoid
Stay safe and effective with these guidelines:
- Always disconnect power and gas before starting.
- Use the correct direction when drilling to avoid losing tools inside the wall.
- Never push lint deeper; always vacuum as you go.
- Inspect for damaged ducts. Flexible plastic or crushed metal needs replacement.
- Avoid leaf blowers, which can spread lint into walls or attics.
Common errors include skipping the exterior vent, using wrong tape, or attempting roof vents without proper safety gear. These mistakes reduce effectiveness or create new hazards.
When to Hire a Professional for Dryer Vent Cleaning
DIY works well for short, straight side-wall runs. Call certified technicians in these situations:
- Roof-vented systems: Height and access create fall risks and tool drop hazards.
- Long ducts (over 25-30 feet) or multiple 90-degree turns: These need specialized equipment like high-pressure air tools.
- Suspected animal nests or heavy rodent activity.
- Older homes with potentially damaged or improper duct materials.
- Recurring problems after DIY attempts.
Professionals use cameras for inspection, sanitize lines, and install proper guards. They also check the full system for code compliance.
How Much Does Professional Dryer Vent Cleaning Cost?
Expect to pay $100 to $300 for most homes, with an average around $145-$200. Factors include duct length, location (roof vs. wall), and number of turns. Complex jobs or same-day service cost more. Many services offer bundle deals with dryer inspection or repair.
While more expensive than DIY, professional work provides thorough results and peace of mind for tricky setups.
Ongoing Maintenance Tips for Long-Term Success
Make dryer vent cleaning part of your routine:
- Clean the lint trap after every load.
- Vacuum behind the dryer monthly.
- Check the exterior vent quarterly.
- Use shorter, rigid metal ducts where possible for better airflow.
- Avoid overloading the dryer or mixing heavy and light fabrics.
These habits keep lint buildup minimal between deep cleans.
Conclusion: Take Action Today for a Safer Home
Dryer vent cleaning delivers one of the highest returns on your home maintenance time. It prevents fires, lowers energy costs, and keeps your dryer performing at its best. Most homeowners handle basic jobs easily with the right kit and steps outlined here.
Assess your setup this weekend. Gather tools, follow the guide, and enjoy faster drying times and greater safety. If your vent runs through the roof or shows heavy issues, contact a local professional right away.
Your family and wallet will thank you. Start with a quick inspection today. What are you waiting for? Clean vents mean a safer, more efficient home.